Friday, 10 November 2017

The Lost and Found Fibonacci Patchwork Quilt

The Lost and Found Fibonacci Patchwork Quilt


I swim every day in the sea at Torre Abbey Steps in Torquay, often joined by other regulars who share the same enthusiasm and pitch up at the same time.  Topics of conversation are wide ranging but often refer to sea state, weather conditions and the inane comments that people make when passing.  There are only so many ways you can answer to "Is it cold in there?" or "you are brave"  My general response is to smile and reply nicely that the sea state is Caribbean......

Anyway one day I was talking, unusually off topic about my love of textiles and in particular the fibonacci quilts and waistcoats I created at Cockington Court. See https://uniquewaistcoats.blogspot.co.uk/2013/04/fibonacci-patchwork-waistcoats.html  and https://youtu.be/BP-TC20Po0w   https://youtu.be/_lxa-9FV7bs A regular swimmer called Laird overheard the conversation and had a recollection of me teaching his late mother, Elizabeth over 25 years ago.  It was rather wonderful to recall to Laird what a clever and dedicated needlewoman she was.   I talked about the regular Tuesday group and how she added her enthusiasms and things we talked about.   We discussed the work she created and I could recall one very large hexagonal quilt which Laird had inherited and another wall hanging created using glazed cotton chintz that he did not recall.

This piece of work suddenly re-surfaced after he mentioned it to another family member.  It had been hiding, folded and unappreciated in a cupboard.  Laird showed me and it was a delight for me to see after all these years and wonderful that Laird has been reunited with a stunning piece of work so lovingly sewn by his late Mother. 


Saturday, 28 October 2017

Mind Cleansing. Letting go and passing on cherished possessions.

Mind Cleansing.  Letting go and passing on cherished sewing possessions. 


Today, feeling stressed, unwell and tired, my thoughts focused on the massive quantities of textiles and haberdashery I have collected over the years, most of it vintage and beautiful.

I ventured to an ottoman and opened a box to find numerous boxes and tins from the 1960's to 80's, Crawfords Petticoat Tails shortbread tin, Benson and Hedges cigarette pack, and a beautifully faded Christian Dior 'Miss Dior' perfume box plus a well preserved toffee tin, each containing buttons matched by size, colour, texture, most in miniature plastic re-sealable polythene sachets.  All with the good intention of being 'used one day'.  I cruelly cut corners off polythene bags so the contents fell into a modern plastic container ocean full of miscellaneous buttons, clasps, buckles and hooks and eyes

I know my mind will be cleansed and less cluttered if I pass on some of my cherished vintage beautiful haberdashery and textiles to people I know, who will appreciate, be creative and inspiring with stuff I will never ever have the time use.  Its time to let go and immediately, I feel better.  Its wonderful to mind cleanse.  www.jackiewills.com


Monday, 16 October 2017

Driven by negative thoughts whilst deep in the creative process.

As a year round sea/river swimmer and hiker often going out at night,  I was not happy with the range of hats on sale with the ability to be visible and keep head warm in the sea as well as a bit quirky and unique.  The answer was to design my own.

Last night I was working late into the night sewing on my machine making my new hi-vis neon swim/hiking hats.  Tweaking and improving the design before adding a range for sale.   Will probably need to make about 20 hats before I am happy with one I can use as a general template.  This is good news for my outdoor friends whom I will give the prototypes too!

Actually promoting my new hat range is not the reason of writing this blog post, the reason I am writing it is because late last night it occurred to me I was being driven by negative thoughts whilst deep in the creative process.   I was having thoughts about things that were highly personal, for example people who had upset me, recalling deeply unpleasant word by word conversations and actions, upsetting news concerning family and friends and past sad personal situations which only surface when deep in the creative process.   Thinking back to the start of my professional creative life in 1984, I recalled in each instance when developing something new and challenging,  my creative drive was coming from personal anxieties, angst and sad situations.  I was really surprised by this.  Has anyone else experienced it?

I would like to add that this emotion only occurs to me when developing something new, not when design is sorted.   Once design sorted, the creative process of making is always with calmness, positivity and happy thoughts.

Interesting stuff.

Images below of some of my new Hi-vis neon outdoor hats:  Each one is unique. Two pics of me wearing on Dartmoor a couple of days ago.  Further information will be posted on my website in due course:  www.jackiewills.com


Tuesday, 28 March 2017

Working with chintz in patchwork and other sewing projects.

Working with chintz in patchwork and other sewing projects.

Chintz has been used in patchwork since 17th century when it was imported from India.   I started using chintz in 1984 after receiving a commission from Charles Hammond Ltd and have been using it ever since.  Unlike craft cotton it is covered in a thin layer of resin creating a glazed effect.  The colours are vibrant and rich and slightly harder to hand sew.  Use a sharp fine crewel needle.  

Whilst chintz is a wonderful fabric to work with it does have its disadvantages.  

If you are buying chintz for the first time compare the glaze and quality from brand to brand, in general the more you pay the better your fabric.  Locate quality soft furnishing showrooms or curtain makers.  In past I have brought excellent quality end of rolls in markets but these finds are few. Buying online can be tricky, always ask for samples before committing to an expensive purchase. 

Try the rip test, the harder the pull the stronger your fabric.  Some chintz snags when you rip and I have found these brands to be inferior.  If the fabric rips easily avoid.   Compare density, richness of colour and general feel. Some chintz feels thin and fine but has high density weave and high in gloss, I have known these to be excellent quality.  Some chintz sold as cotton almost feels like polyester, so perhaps it is. Avoid sateen because it is more loosely woven.  In the past I have asked for chintz and been sold sateen, its something to watch for.  

If you are making an item that needs washing avoid red as it tends to bleed. Wash all your chosen fabrics first because chintz does shrink a bit and poor quality chintz looses its glaze.  Pre-washing is not necessary if making wall hangings or items that will not be washed.  The benefit being retaining the lovely shiny glaze.

Chintz is notorious for creasing these creases are very difficult to remove.  To an extent you can remove a crease by using the hottest iron setting, spray with a fine plant sprayer filled with water and not the sprayer on your iron.  If ironing strips of chintz hold the fabric taught and iron as you go along, this seems to help a bit.  If this fails camouflage, yes camouflage, there is always a way around it!

To camouflage a crease:  the simplest way is to run a straight machine stitch over the crease whilst the fabric is in one piece then use as per normal.  I love the extra texture this gives and also the surprise of seeing it blend into work.  If using small patchwork shapes I would not bother with this method, although if the crease becomes irritating hand embroider over it.  Another way is to machine couch wool over a crease.

So to summarise, look for a nice shiny glaze, a strong feeling texture with plenty of vibrant colour.  
good quality chintz
machine couch wool over a crease

Left: chintz patchwork. Right craft cotton patchwork
single line of machine stitching hides the crease


Wednesday, 18 January 2017

Do I need to spend time and money on a sophisticated website?

Do I need to spend time and money on a sophisticated website?


How much actual monetary value is gained spending time updating websites/social media?  I really wonder? My unsophisticated websites work fine, people email me,  can make purchases, phone to ask questions or arrange studio visits.  I achieve sales and people know where to find me.  Check these out if you are curious:  www.jackiewills.com,  www.patchworktemplates.com,  www.jackiewills.co.uk

The question is:  Do I want spend time updating websites and social media to compete with the latest trends, promotions and flood the airwaves with more images, hashtags and comments or spend the time working on textile art, pushing creative boundaries, accomplishing work which is dimensional, tactile and pleasing to some eyes.

I felt angst and pressure this morning returning from a refreshing sea swim thinking,  "should I be doing tech updates on social media/websites this morning when really I wanted to crack on being creative with my hands." Opening my studio door I found the answer glaring straight at me.  Pinned on my noticeboard was my first business card circa 1983, it is handmade, two hexagons are covered in fabric in the traditional hexagon patchwork format and hand sewn together, then sewn onto the card.  The background was crudely spray painted using a gold aerosol and the words are handwritten. This basic form of communication predates the internet, served its purpose perfectly as I remember people saying to me "oh, I will keep that, thank you."  Result, some 34 years later my work goes from strength to strength.

I think this answers my question.  No, I do not need to spend time and money on a sophisticated websites.  My basic websites will do very nicely indeed.   I would like to point out this is my personal view which works for me.  

Jackie Wills, first business card 1983.


Monday, 24 October 2016

19th Century compared to 21 Century Traditional English Hexagon Patchwork.

19th Century compared to 21st Century Traditional English Hexagon Patchwork. 

 In this fast world of technology and advancement I think it is rather special the basic tools used to create traditional hexagon patchwork in the 19th century are still the same the 21st century.   Fabric, scissors, thread and paper templates were tools used then, just as they are now.   


Thoughts reflect to the scarcity of paper, the precious commodity of fabric and the availability of thread.  Another essential requirement for the sewers of the 19 century was light and eyesight. Electricity was not used until the late 1880's.  I guess to create beautiful stitches sunlight would have been the only option.   It is easy in this age to take for granted night time rooms filled with false light supplied by electricity and to purchase spectacles as eyesight changes as we get older.

The image above on the left shows a sample piece of hexagon patchwork sample dated 1857.


Fast forward to 2016, the tools and method are still exactly the same. Using modern gadgets like rotary cutters, seam rippers, freezer paper and technology to aid accuracy of preparing paper templates.

Back in the 1970's I used isometric paper to accurate create hexagon paper templates and is still my preferred choice. In the 19th century hexagons and other master shapes were made of wood or metal to draw around.  It was a family occupation, often the men taking care of the design process as the women sewed.

The choice of extensive fabric only a click away.  For me there cannot be a finer pleasure than sifting through my fabric stash to find the exact remnant for a chosen project as can be seen in the images below.  Vintage on left and Victorian on right.


Monday, 5 September 2016

Anonymous Chintz Patchwork Waistcoat by Jackie Wills

Anonymous Patchwork Waistcoat 

Last Saturday the postman delivered a large padded jiffy bag parcel with my name written in large felt pen, clearly not an online purchase!   I struggled to prise open the staples and peeped in side.  I could see a patchwork of strong chintz colours and embroidered thread, baffling but also a tad familiar.

The garment slipped onto the polished walnut table as I stared in silence and disbelief.   Yes, it was definitely a waistcoat  I created more than 20 years ago, inspired by the windows at Buckfast Abbey.

A beautifully typed letter slipped from  the garments folds.  Some of the words are reproduced below:

"Dear Miss Wills

We brought this waistcoat from you at an Exeter Cathedral Summer Fayre many years ago.  We couldn't bear to just give this to a charity shop.  It's a beautiful into which you clearly put a huge amount of time, effort, skill and devotion.  It's still in excellent condition so we are sending it back to where it will be still loved and appreciated.

With sincere thanks for this waistcoat and for the time it belonged to us.

Very best wishes

Anon"

Anon, if you read this I am sincerely touched and hugely overwhelmed by your gesture,  I will keep it and wear it myself as it fits a treat!  A happy reminder of past stitches, time and creativity.

Thank you.


Tuesday, 15 December 2015

Spooky True Story about a Waistcoat

Spooky True Story about a Waistcoat

It has been on my radar to write a blog post for several weeks. I was surprised last post was June 2015.   I struggle with juggling home life, work life, creativity, swimming adventures and technology

Yesterday morning I opened https://www.facebook.com/JackieWillsTextileArtist and found a message and a couple of photographs from AB.  I instantly recognised the work in the photographs to be a long sold waistcoat.   Distinctly my style, distressed blue denim with hand painted bamboo and abstract hearts along with added embroidery.

AB asked if I could confirm that it was one of my garments and if so what year.

Well, I could definitely confirm that it was one of my waistcoats, I just hoped that I had a photo to prove it.   I searched through my content and found the exact one, referenced TY 724.  In those days I would make a garment, take a random snap for personal reference and sell it.  The date looked like the year 2000.   In those days photos were non digital and and would be printed out via  by the excellent services of Trueprint.

TY 724 is reproduced below:

AB lives in Spain,  he came across the waistcoat in a charity shop.  He said it had been well looked after and in good condition.  Anyway AB wore it to work in Spain and a few people commented on it. Apparently one person knew the designer (me). Right now I cannot think of anyone I know in Spain! How is that for a spooky coincidence!!

Naturally I am delighted that TY 724 has retired to Spain and has found a new owner who will cherish it as much as the first.  


Friday, 12 June 2015

Idea for Patchwork or Needlework Sample. Create Wearable Pocket

Idea for Patchwork or Textile Sample.  Create Wearable Pocket.

So annoying when you are chasing around, phone rings, stops before you reach it or you want to read something quickly and glasses are in another part of building.   For convenience and practical working I need to have mobile and landline phone, plus glasses and handkerchief all in one place without having to search.

Clothes with pockets never seem to work and light purses or bags can be cumbersome around the neck.

Looking for a practical use for a patchwork sample created recently, a wearable pocket was a clear winner.

Easy to make using no fraying fabric.  I used a light nylon mesh.   Cut a rectangle double the size of needlework.  Allow extra around the edges and for seams.   Cut long strip for tie, enough to go around your waist and to make a bow.   I folded tie length in half.

Sew together. 


Monday, 1 June 2015

Helen in the Sea - Textile Pictures by Jackie Wills 2015

Helen in the Sea - Textile Pictures by Jackie Wills 2015

Blog has been neglected recently, partly due to distractions and developing new ideas.

I was inspired to submit some work for selection for the 'Just Add Water' exhibition at Hannahs, Seale Hayne near Newton Abbot.  http://www.discoverhannahs.org/events/current/exhibition-just-add-water/  

I wanted to create a textile painting of wild sea with a swimmer.  Below is Helen in the Sea One.  

Helen in the Sea One by Jackie Wills

This work was inspired by my lovely friend Helen.   Over the years we have shared many fantastical adventures wild swimming, often in extreme conditions in the sea and rivers of Devon.  We were at the Ness Beach at Shaldon, it was a horrid day, the beach was deserted and the sea was crazy. Red stones growling as they rolled in the surf. It was agony to the feet.  I took a photograph as Helen walked in and tamed the sea.  I used my image to create three very different pictures of Helen in the Sea.

Helen in the Sea, building interpretation with paint on canvas and denim


Using ecru canvas on the left and distressed denim on the right I built my interpretation with paint. Texture was applied with machine embroidery, couching with thread and wool. Voile provided further subtile texture. A few other haberdashery oddments were sewn in to finish.   The works then framed.

detail, Helen in the Sea Two by Jackie Wills

  
Above:  Helen in the Sea One by Jackie Wills 2015

Tuesday, 3 March 2015

Easy Way to Colour Patchwork Pattern. Fibonacci & Elongated Hexagons EPP

Easy Way to Colour a Patchwork Pattern. Fibonacci & Elongated Hexagons EPP

I have been hand sewing hexagons for over 45 years.  In the old days I would use isometric paper to design hexagon patterns.  This method works well if your hexagons are all the same size.   My packs of hexagon paper templates include hexagon grids for designing and www.patchworktemplates.com has one that can be printed free of charge.   These can be photocopied and coloured in.   

The pattern planning changes when different shapes are used in one design.  Fibonacci and Elongated Hexagons come to mind.  This also applies to other shapes that tessellate.   


There is an easy solution.    Lay paper templates out on a flat surface.   Spend time moving shapes around until your eyes are pleased. This will help visualise colours and structure of pattern.
Photograph arrangement, print onto copy paper and colour with crayons.  

Another option is to photograph, create a digital image on computer, insert photograph onto a paint or desk top publishing document. I use Pages on Macbook.   Using a small coloured shape, duplicate many time and place onto the centre of each paper template.   Print.

See: http://youtu.be/M6ePQYWEQC4

It is really simple and gives room for experimentation before committing to fabric.


Monday, 2 February 2015

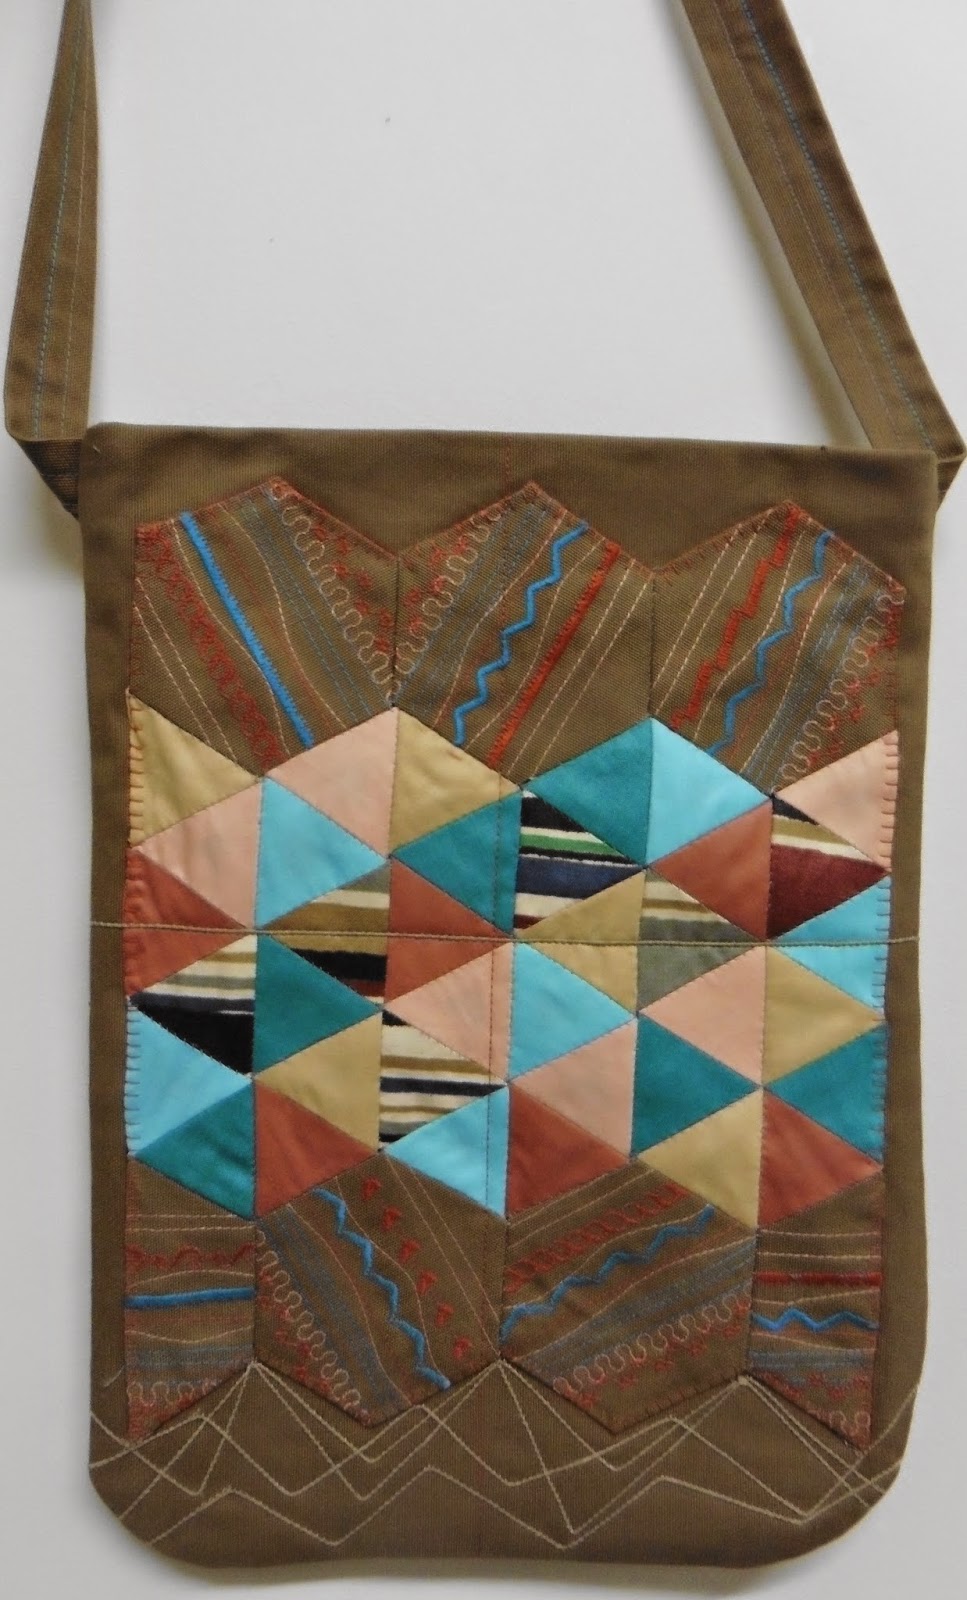
Create a shoulder bag from Patchwork Sample. Easy make Purse


Create a shoulder bag from Patchwork Sample. Easy make Purse

Recently I have been receiving requests for equilateral triangle patchwork paper templates.   They are not currently listed on my websites but are available upon request.  

I decided to create a sample using triangles and really enjoyed the process.   The sample was too nice to put in the cupboard along with many others, so I decided to create a simple bag with it as a feature.


I chose Ecru canvas as it is a firm fabric ideal for this purpose and compliments the glaze of cotton chintz, although I was concerned that it would look a little "plonked" on so I created a gentle blend by machine embroidering some canvas with pretty stitches then making the canvas into hexagons to add to the bottom and top of the triangle patchwork sample.  

After appliqueing the work onto the canvas I couched some string to add more texture and dimension to the design.   The result worked well.


Instead of a blank back of the bag I did a bit more machine embroidery and added some enhancing chintz to break up the solid colour.

I was tempted to put a zip as a closer for the bag, being honest zips look good but I prefer a strip of velcro inside the lining.   It makes easier access and in my opinion more discreet.


See youtube video clip:


www.jackiewills.co.uk I have lots of samples and unfinished projects languishing in my sewing room. This slide shows how to make a bag by adding further embroidery. This idea can be adapted in many ways to suit you. I have sewn the patchwork onto canvas fabric and couched string to add some dimension. The bag is simple. Velcro has been used in favour of a zip and remains hidden within the lined bag. The bag can be made any size to suit your requirements.


Thursday, 8 January 2015

Vintage Hexagon Patchwork Project & The Lost Project from the 1980's by Jackie Wills

Vintage Hexagon Patchwork Project & The Lost Project from the 1980's by Jackie Wills

Back in the early 1980's, before I started to use cotton glazed chintz fabric for hexagon patchwork,  I created the Red Themed Patchwork wallhanging shown below.  It comprises of 547 hexagons.  Each hexagon side measures 5/8" or 34mm.   

The other day I came across a small bag of fabric squares, templates and covered hexagons, clearly cherished at the time.  I remember that after finishing the Red Theme,  started on the Blue and made it to about half the size.   

The last time saw it was at Cockington Court where I had a patchwork studio/workshop in 1991/2.  Must have got lost in moving or something like that. Its possible I sold it, long time ago now.  Must have a photo of it somewhere.....

I wonder if it still exists,  if it is enjoyed or at the bottom of a refuse tip.  Who knows......

I created the pattern using an isometric grid and feel that the design is best suited to stripe fabric.  The fabric is an important memory for me as the pretty striped pattern was available in three different colour ways, red, blue and green.  I love the little hearts and "Feather Stitch" detail in the pattern.  

Lightweight cotton fabric was purchased at the Remnant Shop in Torquay.  For those who remember the crowded rows of rolls and rolls of fabric, the smell of the shop, the mass of fabrics to explore on laden shelves.  A chap called Sidney owned the chain of shops, one in Torquay, Paignton and I think Newton Abbot as well.   It was a heavenly place to visit for every kind of fabric imaginable if you could work your way through and find what you were looking for.

I have a video clip with more images to go with this blog:

                                                                                    http://youtu.be/w0Ne_-5elJg

                                                                                    www.jackiewills.co.uk  

buy patchwork templates from www.patchworktemplates.co.uk

Tuesday, 30 December 2014

Miniature Hexagon Patchwork, The Joy of using Hexagons each side measuring 5mm.

Miniature Hexagon Patchwork, The Joy of using Hexagons each side measuring 5mm.  

During the Christmas holidays I came across a tin of unfinished hexagon projects.  The common feature being miniature or small.  Tidying and sorting made my fingers itchy to finish or restart at least one of the started pieces.

Unfinished miniature patchwork projects by Jackie Wills

For those who have been reading my previous blogs, my last big project was using 10cm hexagons, each side measuring 5cm.  I almost became complacent and sleepy sewing large hexagons.  Jumping to the extreme I picked up the unfinished work using hexagons with each side measure 5mm.  Quite a difference,  but exactly the same technique magnified.  Yes, using 1cm hexagons with sides of 5m is fiddly.   Enjoyably fiddly.

If you plan to do this yourself I would recommend long natural thumbnails, they become a great tool folding fabric with precision over the miniature 90gsm hexagon papers.  Sewing darker colours together using matching thread makes sewing less easy, do not succumb and use light thread to sew dark hexagons together.  It will wreck the look. 

Last night I accidently put on an older pair of reading glasses and could not understand why I struggled to view my stitches. Made a massive difference using proper glasses and a good overhead lamp.  

My personal preference is to allow plenty of fold over fabric, creates a bit of bulk on the back but adds texture.  The deep purple fabric hexagons have been created using quite heavy chintz, so the purple hexagons have been hard to keep accurate.  See hexagon centred on fabric image below top right.

Do not use irregular badly covered hexagons, as they will spoil the overall look.  I noticed a real difference using lighter weight turquoise fabric, perhaps more dense and harder on the needle but much easier to fold over the paper hexagons.   

I find using a long fine crewel needle size 10 far easier than a shorter length big eye quilting needle.  Size 9 is OK, size 8 not recommended.  Compare the needles in your sewing box and experiment with the size that works for you.  

Paper hexagons can be purchased from www.patchworktemplates.co.uk

See miniature hexagon patchwork demonstrations: https://www.youtube.com/user/thejaxcollection

My renewed enthusiasm for this project of old has been most rewarding.   Like a good book its hard to put down, making one more hexagon often leads to a string of six and 20 minutes lost time......


Miniature hexagon patchwork by Jackie Wills using 1cm hexagons, each side 5mm


Tuesday, 16 December 2014

Using a sewing machine with a stop/start button for the first time

Using a sewing machine with stop/start button for first time.

Years of using a sewing machine foot peddle plus other injury has taken its toll on my leg.  Constant repetitive pressing and releasing of the foot peddle made sewing unbearable.  It will never get better, only worse the more I do the action, so I resigned my sewing machine days were over.  A great sadness.

A few weeks ago I had to use my machine for a chore after a break of several months.  The repetitive action almost made me cry, not so much in pain but in realisation that I really missed making things and being creative with my trusty Husqvarna.   At this point I looked online to check out the latest sewing machines, perhaps a machine with a knee control.   I must have been living in the dark ages because all these machines popped up with stop/start buttons, a mechanism new to me.

I phoned The Exeter Sewing Machine Company to ask if they had a machine with this option to try. Always helpful they advised I should visit for a demonstration.  A few days later with an extra spring in my step I bounced into the shop.   A young lady showed how the stop/start button and speed control on a Brother sewing machine worked.  Yes, it worked, a light press on the button and the machine zoomed, the speed adjusted with a sliding control near to the stop/start button.  In truth I was not convinced I could do the intricate embroidery and precise stitching without the familiar foot peddle control action.   Also I was not familiar with Brother sewing machines, after so many happy years using vintage Bernina 730 and later Husqvarna Lily.

I came back to my studio unconvinced.   After a few days I realised if I wanted to use a sewing machine again I had to go for it.   I purchased a Brother Innovis 350 from Exeter Sewing Machine Company.  So easy by phone and debit card.   It arrived the next day.   I briefly read instructions and within an hour the machine was threaded and fabric underfoot.  I pressed the stop/start button and the machine came to life with perfect tension straight stitches.  

I will not pretend I found it easy.  The stop/start button is instant, and the slide speed control is slow or too fast.  Using a hand instead of a foot to control action stop/star and speed takes getting used to. I need my hands to control the fabric.  Definitely need to multi task and think ahead.   Would I ever get used to it?   I walked away several times in frustration.  Each time I returned was easier.   Also I took the manual to bed and read every word.  

There came a delicious high point when I discovered the capabilities of this machine exceeded all my expectations.  The emphasis is practice, practice, read the manual and practice.  I feel a whole new sewing adventure starting.   See my video clip of this machine at work 
https://www.youtube.com/watch?v=WWxD_8-_1_E

stop start button on Brother sewing machine.

freehand embroidery and applique created using stop start button


Thursday, 11 December 2014

Create a patchwork quilt using large hexagons. Finished. Final Part 14

Create a patchwork quilt using large hexagons. Finished. 

On 12 February 2014 I wrote the part 1 of 14 parts on this series.   Ten months later the hexagon quilt or coverlet as I now like to call it is finished.   Like most things in life work did not map exactly as planned, creativity allows flexibility.   Initially The Coverlet was going to drape the bed completely, some months ago the plan changed because I felt the the bedroom would be swamped by colour and would remove the relaxing mode vital to the place you sleep.

I have some hexagon rosettes remaining and with those I plan to remake by sewing machine the bolster pillows already on the bed and I may even restyle the bedhead.   

From one spare curtain, plus additional complimentary fabrics from my collection,
each hexagon has been a joy to create, each stage a pleasure to view and the final result pleases me enormously.  Midway making my partner of 20 years unexpectedly proposed to me and we married within five weeks in May.  Its been a wonderful year.

I have created a little video clip to show the end result https://www.youtube.com/watch?v=aSWJBAWXpqg

Patchwork paper templates can be purchased from www.patchworktemplates.co.uk and links will take to further gallery images.

For those who have been following progress I hope its been enjoyable too.